8.9.4 Backup + restore - LUPMISManual
Main menu:
8.9.4 Backup and Restore
Level of expertise required for this Chapter: Intermediate; specifically for LUPMIS @ TCPD

- a) Backup Databases
Backup is the most import database activity. At least, once a month and always after data entry backup should be performed by Settings > Backup of databases > Backup of all databases > Continue:
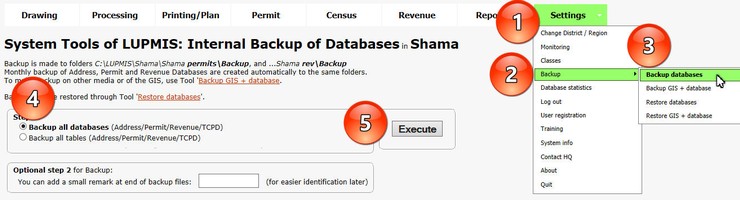
If data are entered or changed, backup has to be performed even daily. Backup of the data are copied to files (SQL) with a date and time stamp, e.g. Backup_..._2015-01-03-1302.sql. These files can be used for transfer to other LUPMIS installations or in case of re-generating the database (see below).

Technical Note 1: Backup of Permit, Census, Address, TCPD databases are stored in folder Backup of Permits folder, while the Revenue Database backup is saved in folder Backup of Rev folder.
- b) Backup GIS and Database

- All planning folders: All files of SDF, StrPl and LP folders.
- All GIS folders: This includes the previous folders ('All planning folders'), plus dra folder,
but not including any images (ECW, JPG etc).
- All database data: Functionality is the same as 'Backup of databases' (see Chapter (a) above),
to create a backup SQL file.
- All GIS and database data: This option includes all three above listed content versions.
- All images (ECW format): Backup of all images in the photos and topo folders,
but not any JPG files, only ECW files.If you still have JPG image files, convert them first to ECW files, to avoid oversize of your backup.
- Internal: Create a backup of your data on the local computer (e.g. C:\LUPMIS).
- External harddisk, USB device or mapped drive: Create a backup for case of computer crash,
or for transfer of data to a separate LUPMIS installation.A drive letter (D: through Z:) has to be selected (e.g. identified in Windows/File Explorer).For mapped drives, see Technical Note 3 below.
- Network server (LAN) through IP address. Enter IP address (starting with 10, 172 or 192) and password.
The LAN storage device must have a shared folder 'LUPMIS', to where the backup will be made.
- Internet storage provider through IP address: With same rules as above.

(next available letter from the bottom) with the CLI command:net share * \\12.34.56.78\foldername /u:\\12.34.56.78\foldername password
- c) Restore Databases
Before you do any restore, make first a backup of whatever you have, in case of a crash. You can restore from a SQL file through Settings Tools > Backup > Restore database > Select database > Restore backup
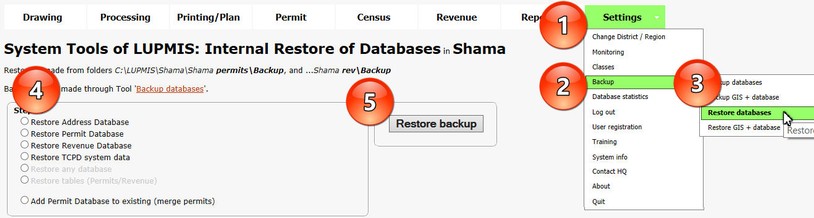
> Select file > Execute.

This SQL file can also be restored in a separate LUPMIS or SQL installation. Thus, it can serve as a means to transfer the database, e.g. to GELIS, CSAU.
- d) Restore GIS and Database
- All planning folders:
In the Backup folders of the SDF/StrPl/LP folders, there are DRA files, which can be loaded directly in Map Maker. For ease of use, take the date/time stamp out from the file name (rename) and copy them, together with the DBF file, to the SDF/StrPl/LP folder.
- All planning folders, as ZIP files:
In the Backup folders of the SDF/StrPl/LP folders, there is 1 ZIP file each. It has to be un-zipped (using WinZip, PKzip, or 7-zip) to the SDF/StrPl/LP folder, then follow instructions of 'All planning folders' above.
- All GIS data: Same procedure as described above under 'All planning folders'
- All GIS data, as ZIP files: Same procedure as described above under 'All planning folders, as ZIP files'
- All database data: Same procedure as described above under 'c) Restore database' (Chapter 8.9.4.c).
- All GIS and database data, as 1 large ZIP file:
In folder LUPMIS\Backup, there is 1 large ZIP file. It has to be un-zipped (using WinZip, PKzip, or 7-zip) to the District folder. Follow the instructions above for 'All GIS data'.For the databases (Permits etc), you have also to restore the database SQL file: Easiest with the 'RestoreTool' (see Chapter 8.9.4.c). Alternatively, this can be performed in MySQL.
- All Images in ECW format:
These images are already highly compressed in ECW. They can be copied directly from the backup folder to the recovered folder. Bear in mind, there is also a national data warehouse with an archive of all images. Contact TCPD-HQ.
- e) Disaster Recovery
1. Try to repair the computer (e.g. re-install the operating system, format the harddisk, replace malfunctiong hardware part etc).2. Install LUPMIS (with all 4 steps) from file LUPMIS_installation.exe. Ask TCPD-HQ to send, if you don't have.- For the databases:3. Find the latest backup of the databases, which you can find on the LAN, Internet or external device, for the Address, PDB and TCPD (and Revenue) databases.4. Start LUPMIS and set up your District (Settings > Change District > Add District). This will create an entire folder structure in your LUPMIS installation.5. Copy these 3 ( or 4) SQL files to the backup subfolders of permits and rev.6. Restore all of them with Settings > Backup > Restore databases (also explained above).- For GIS data (except images):7. Find the latest backup of the GIS data, which you can find in your backup, for GIS data of SDF, Structure Plan, Local Plan and dra folder.8. Copy these DRA files to the new LUPMIS installation.- For images:9 . As images might be of large volume, you might not have made a backup. Contact TCPD-HQ and ask for a copy.10. Copy these images to your folder photos (e.g. C:\LUPMIS\GaSouth\GaSouth photos).
1. It was a big fault, that you didn't back up properly. Hopefully, this was a lesson for future!2. You must try to recover the latest backup of the databases, you or the system made in the backup subfolders of permits and rev (e.g. C:\LUPMIS\GaSouth\GaSouth permits\Backup). They cover the databases of Address, PDB and TCPD (and Revenue). Filenames are self-explanatory, e.g. Backup_PDB_GaSouth_2015-09-16-2009.sql. Take the latest copy.3. You must also try to recover the latest backup of the GIS data of SDF, Structure Plan, Local Plan and dra folder.4. From there you can continue with the instructions above (see point A, except step 3 and 7).
1. Look for the latest copy in the backup subfolders of permits or rev (e.g. C:\LUPMIS\GaSouth\GaSouth permits\Backup).2. Restore it with Settings > Backup > Restore databases (also explained above).
1. Look for the latest backup of your DRA files in the folders of SDF, StrPl, LP or dra (e.g. C:\LUPMIS\GaSouth\GaSouth LP\Backup).
2. Copy these DRA files into your LUPMIS installation.
1. Contact TCPD-HQ and ask for a copy.
2. Copy these images to your folder photos (e.g. C:\LUPMIS\GaSouth\GaSouth photos).

