LUPMIS - GIS User Manual for Land Use Planning
Main menu:
- Home Page
- 0. Rationale
- 1. GIS handling
- 2. GIS data entry
- 2.1 Create new layer
- 2.2 Digitize line
- 2.3 Digitize point
- 2.4 Digitize polygon
- 2.5 Edit existing layer
- 2.6 Delete feature
- 2.7 Split line
- 2.8 Split polygon
- 2.9 Merge lines from different layers
- 2.10 Unite lines
- 2.11 Snap lines
- 2.12 Join polygons
- 2.13 Extend polygon
- 2.14 Insert island
- 2.15 Define unit surrounding islands
- 2.16 Create 'doughnut'
- 2.17 Fill 'doughnut' polygon
- 2.18 Fill polygon with 'holes'
- 2.19 Digitize parcels from sector layout
- 3. GIS operations
- 3.1 Create buffer
- 3.2 Create exclusion zone
- 3.3 Overlay units
- 3.4 Convert line to polygon
- 3.5 Derive statistics (area size, length)
- 3.6 Clip unit according to other unit
- 3.7 Create geographic grid
- 3.8 Move entire vector map
- 3.9 Move or copy individual features on a map
- 3.10 Adjust polygon to line
- 3.11 Convert points to polygon
- 3.12 Define by distance
- 3.13 Create multiple objects
- 3.14 Transfer styles from one layer to another
- 4. Attribute database
- 4.1 Start with database
- 4.2 Import database
- 4.3 Display database information
- 4.4 Enter attribute data
- 4.5 Attribute matrix of multiple layers
- 4.6 Seeds
- 4.7 Repair attribute data
- 4.8 Merge lines with attached database
- 4.9 Transfer attribute data from points to polygons
- 4.10 Copy styles, labels, attributes
- 5. Conversion of data
- 5.1 Points
- 5.1.1 Import list of points from text file
- 5.1.2 Import list of points from Excel file
- 5.1.3 Convert point coordinates between projections
- 5.1.4 Convert point coordinates from Ghana War Office (feet)
- 5.1.5 Convert point coordinates from Ghana Clark 1880 (feet)
- 5.1.6 Track with GPS
- 5.1.7 Download GPS track from Garmin
- 5.1.8 Download GPS track from PDA
- 5.2 Vector maps
- 5.3 Raster maps
- 5.3.1 Import raster map from external source
- 5.3.2 Quality-check raster file
- 5.3.3 Georeference scanned map
- 5.3.4 Re-georeference image
- 5.3.5 Load sector layout map
- 5.3.6 Shift raster map
- 5.3.7 Download Google Earth image
- 5.3.8 Clipping and masking images
- 5.3.9 Enhance georeferenced image
- 5.3.10 Batch-convert raster images
- 5.4 Communication with other GIS programs
- 5.4.1 Import GIS data from SHP format
- 5.4.2 Import GIS data from E00 format
- 5.4.3 Import GIS data from AutoCAD
- 5.4.4 Export LUPMIS data to other programs
- 5.4.5 Export GIS to AutoCAD
- 5.4.6 Change a shape file to GPX
- 5.4.7 Transfer GIS data to other LUPMIS installations
- 5.4.8 Digitize lines in Google Earth
- 5.5 Terrain data
- 5.1 Points
- 6. Presentation
- 7. GIS for land use planning
- 8. LUPMIS Tools
- 9. Databases
- Annexes
- A1. Map Maker setup
- A2. Background to cartography and raster images
- A3. Glosssary
- A4. Troubleshooting
- A5. Styles
- A6. Classification for land use mapping and planning
- A7. GIS utilities
- A8. Map projection parameters
- A9. Maps in pilot areas
- A10.Standards
- A11. LUPMIS distribution CD
- A12. Garmin GPS
- A13. Training
- A14. ArcView
- A15. Population statistics
- A16. Entry and display of survey data
- A17. External exercises
- A18. Programming
- A19. Paper sizes
- A20. Various IT advices
- A21. Site map and references
A18.4 Call from Access
Annexes > A18. Programming
A18.4 Call from MS Access
Level of expertise required for this Chapter: Expert / Programmer; general Map Maker training
This process uses the MMmacro function of Map Maker, which is a standard add-on to Map Maker (by default in folder C:\Map Maker). Annex 18.5 below lists commands of MMmacro.
It is recommended to have a ‘modular’ approach, as some steps are not always required (for example, to load Map Maker), some other steps can only be called after the previous step has been finished, sometimes time-consuming (for example, printing to file). Alternatively, it is possible to develop checking routines for automatic performance (not explained here).
In general: Access: Open Map Maker --> Access: Send variable (layer) --> Map Maker: Add layer --> Access: Define and send variable (UPN) --> Map Maker: Zoom to UPN --> Map Maker: Print to JPG file --> Access: Load JPG file --> Access: Report
1. In Map Maker, create a template and save it in C:\LUPMIS\Permits\Template_parcelmap.ptp.
Parcel permit templates will be supplied by TCPD-HQ / LUPMIS (see also Chapter 6.5 on templates).
- - - -
2. Security settings must allow access See <a href="a11_installation_and_configuration.html#Part12">Annex 1.1.12</a>.
- - - -
3. It is assumed, that youhave an Access database (MDB file) with all parcel data. Otherwise, it has to be created using standard Access commands (as explained in step 2 of Annex 18.2).
- - - -
4. Main table (tbl_parcel) must have the same structure as explained under step 3 of Annex 18.2.
- ‘UPN’ (text, field size:13)
- ‘ID’ (autonumber, as primary key)
- Additional fields are possible.
Make sure, that the field ‘UPN’ contains the same UPN numbers as the field ‘ID’ of the related DRA file. (See also Annex 10 on data standards).
- - - -
5. Most likely, data will be retrieved from various tables. A main query (qry_parcel) should be defined, using standard Access commands. It should have at least the fields required for tbl_parcel (see above) with the criteria [Forms]![frm_parcel]![UPN] in the UPN column.
- - - -
6. Create a report (rpt_parcel) using standard Access commands (Create > Blank Report >>> and save as rpt_parcel).
- - - -
7. This report should have qry_parcel as the main data source:
Reports: rpt_parcel (as just created) > right-mouse: Design View > top left: Right-mouse > Properties > Property sheet window: Data > Record source: qry_parcel > Close and save it
- - - -
8. In this report, add an image (i.e. the map) using standard Access commands (Design > Image) and choose C:\LUPMIS\Permits\Temp_parcelmap.jpg. If it doesn’t exist, create a dummy to start.
Under Properties > Format, following parameters should be set:
- Visible: Yes
- Picture: C:\LUPMIS\Permits\Temp_parcelmap.jpg
- Picture type: Linked
Close and save the report.
- - - -
9. Create a form (frm_parcel) using standard Access commands (Create > Form Design or Blank Form >>> Close and save as frm_parcel).
- - - -
10. This form should have qry_parcel as the main data source:
Forms: frm_parcel (as just created) > right-mouse: Design View > top left: Right-mouse > Properties > Property sheet window: Data > Record source: qry_parcel > Close it
- - - -
For the next steps (11-18), continue in this form:
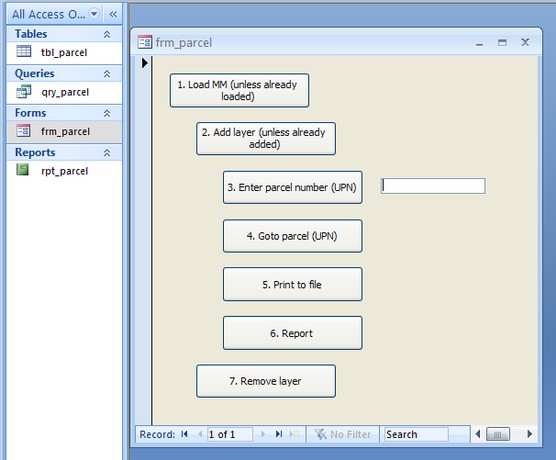
11. Create 1st command button to load Map Maker (Design > Button)
Under Properties > Event > On Click, include following event procedure (subprocedure):
Private Sub Command9_Click()
Dim Id1
Id1 = Shell("C:\Map Maker\MMM.exe", 1)
End Sub
Under Properties > Format > Caption, enter ‘1. Load Map Maker (unless already loaded)’ or similar.
- - - -
12. Create 2nd command button to add a layer into Map Maker (Design > Button).
Under Properties > Event > On Click, include following event procedure (subprocedure):
Private Sub Command3_Click()
Dim Id2, str1Name, str2Name As String
str1Name = "C:\Map Maker\MMmacro.exe"
strQuote = Chr$(34)
str2Name = "command=add layer,filename=C:\LUPMIS\Kasoa\Kasoa_dra\Kasoa_sector05.dra,name=Sector,label=No label"
Id2 = Shell(strQuote & str1Name & strQuote & Space(1) & strQuote & str2Name & strQuote, 1)
End Sub
Under Properties > Format > Caption, enter ‘2. Add layer’ or similar.
Be aware, that there is a limit to the number of characters in the str2Name definition of the event procedure. The entries under filename= and name= do not have to correspond to each other.
Alternatively, in an advanced version, you can create a pull-down menu (combo list or similar) to be less static in the selection of the added layer.
Alternatively, you can load a Map Maker project (see Chapter 1.6) with or without pull-down menu (see Annex 18.5 for syntax).
- - - -
13. Create 3rd command button to display parcel number entry step, without event procedure.
Under Properties > Format > Caption, enter ‘3. Enter parcel number (UPN)’ or similar.
- - - -
14. Create text box (Design > Text Box) without data (Data > Control Source: empty, Data > Text Format: Plain text), without event procedures (Event: all empty), with the name of the text box: ‘UPN’ (Other > Name: UPN).
Alternatively, you can create a pull-down menu (combo list) generated from the field ‘UPN’ of tbl_parcel.
- - - -
15. Create 4th command button to go to the specific parcel in Map Maker (Design > Button).
Under Properties > Event > On Click, include following event procedure (subprocedure):
Private Sub Command5_Click()
Dim Id2, str1Name, str2Name As String
str1Name = "C:\Map Maker\MMmacro.exe"
strQuote = Chr$(34)
str2Name = "command=goto id,layer=Sector,id=" & Forms!frm_parcel!UPN & ",autoscale=2"
Id2 = Shell(strQuote & str1Name & strQuote & Space(1) & strQuote & str2Name & strQuote, 1)
End Sub
Under Properties > Format > Caption, enter ‘4. Goto parcel (UPN)’ or similar.
- - - -
16. Create 5th command button to go to print to a temporary graphics file (Design > Button).
Under Properties > Event > On Click, include following event procedure (subprocedure):
Private Sub Command10_Click()
Dim Id2, str1Name, str2Name, str3Name, str4Name As String
If Dir("C:\LUPMIS\Permits\Temp_parcelmap.jpg") <> "" Then Kill "C:\LUPMIS\Permits\Temp_parcelmap.jpg"
str1Name = "C:\Map Maker\MMmacro.exe"
strQuote = Chr$(34)
str2Name = "command=print,filename=C:\LUPMIS\Permits\Temp_parcelmap.jpg,template=C:\LUPMIS\Permits\Template_parcelmap.ptp"
Id2 = Shell(strQuote & str1Name & strQuote & Space(1) & strQuote & str2Name & strQuote, 1)
End Sub
Under Properties > Format > Caption, enter ‘5. Print to file’ or similar.
This will use a template (Template_parcelmap.ptp in default folder C:\LUPMIS\Permits) to create a temporary JPG file (Temp_parcelmap.jpg in the same default folder).
- - - -
17. Create 6th command button to display the final report in preview mode (Design > Button).
Under Properties > Event > On Click, include following event procedure (subprocedure):
Private Sub Command7_Click()
DoCmd.OpenReport "rpt_parcel", 2
End Sub
Under Properties > Format > Caption, enter ‘6. Report’ or similar.
- - - - -
18. Create 7th command button to clear the layer in Map Maker (Design > Button).
Under Properties > Event > On Click, include following event procedure (subprocedure):
Private Sub Command11_Click()
Dim Id2, str1Name, str2Name As String
str1Name = "C:\Map Maker\MMmacro.exe"
strQuote = Chr$(34)
str2Name = "command=remove layer,name=Sector"
Id2 = Shell(strQuote & str1Name & strQuote & Space(1) & strQuote & str2Name & strQuote, 1)
End Sub
Under Properties > Format > Caption, enter ‘7. Remove layer’ or similar.
- - - -
Close and save the form.
19. The database (MDB file) can have astartup function to point to the retrieving form (frm_parcel): With the database open: Access tool button > Access Options (at bottom) > Current database > Display form > frm_parcel > OK > Close it
In MS Access 2003: Load database > Main menu > Tools > Startup > Startup window: Display Form/Page: Select Form1 > OK
- - - - -
In an intermediate phase of development, a user interface can look like below, or similar:
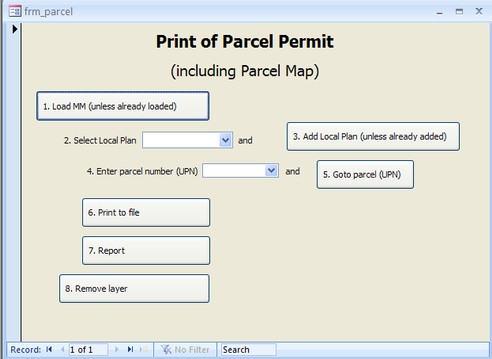
Further customization is possible with function and subroutines, including in-built quality-control and check for completion of procedures.


Sub-Menu: